
There is one thing every IT professional, software developer, and technology enthusiast would love to have in their computers – a virtual machine.
Virtual machines allow individuals to run a complete operating system within an app window of a desktop. This operating system behaves like a computer. Therefore, virtual machines help in enjoying different operating systems, all within one hardware.
Here, you can run software that the main operating system doesn’t support or create a sandboxed environment for trying out new apps and codes.
In Windows, Hyper-V offers hardware virtualization that lets users run various operating systems.
Benefits of Using Hyper-V
If you wondering why you should install and activate hyper-v windows 10 home, then look at its benefits. For starters, the feature is immensely lucrative for IT enthusiasts since it helps in creating virtual switches and hard drives within the computer. Apart from this, it allows individuals to:
- Run a software on Windows 10 that is only compatible with an older version of Windows or, in some cases, require a non-Windows operating system.
- Experiment with different operating systems by making it easy to develop and remove added operating systems.
- Test developed software on a wide variety of operating systems.
The Step-by-Step process of Activating Hyper-V
To avail the benefits of hyper-V, you must first learn how to activate it on your Windows 10. Here is a detailed process for doing so.
Step 1: The Must-Haves
There are certain prerequisites to running Hyper-V on Windows 10. Without the proper operating system and hardware, the virtual machine cannot be used. Here are the elements you require:
- 64-bit versions of either Windows 10 Pro, Education, or Enterprise
- A 64-bit processor equipped with SLAT (Second Level Address Translation)
- A minimum 4 GB system RAM
- Hardware Virtualization Support of BIOS-Level
Step 2: Set it up
Begin by enabling hardware virtualization support via the BIOS settings within your desktop. Boot up the machine after saving the new BIOS setting.
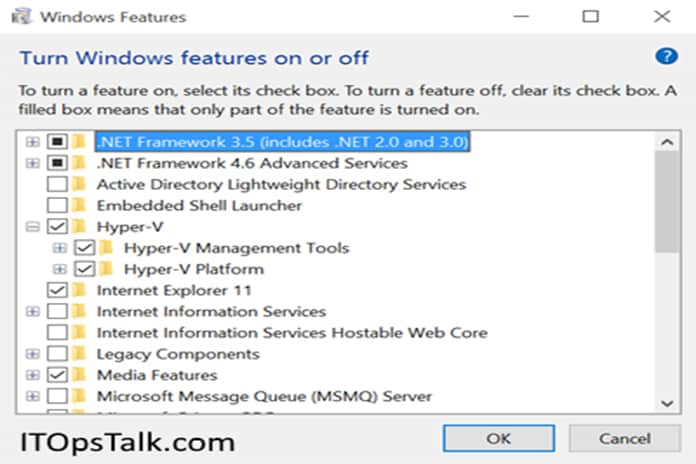
Proceed by going to the taskbar and searching for “Turn Windows Features on or off.” Click on the item named Windows10_HyperV_001. Once you do so, select Hyper-V to enable it.
In the case that Hyper-V wasn’t already enabled on your desktop, to save the changes, you must reboot your computer.
Step 3: Launch Hyper-V
After setting up hyper-v, to make the most of it, you must learn how to launch it.
Do so by going to the Administrative Tools section of the control panel and then opting for Hyper-V Manager. Within the left pane of the manager, click on the machine name to enable the appearance of the actions pane on the right side of the screen.

Proceed by clicking on “New” and then ”Virtual Machine.” This will launch a wizard for creating a new virtual machine. All you have to do is follow the on-screen instructions. During this process, you can choose to name your virtual machine as well as provide a location for its storage.
Also, you will have to make the decision regarding the type of generation you wish to choose. In case you are creating a virtual machine for accessing old applications, we suggest that you go with Generation 1.
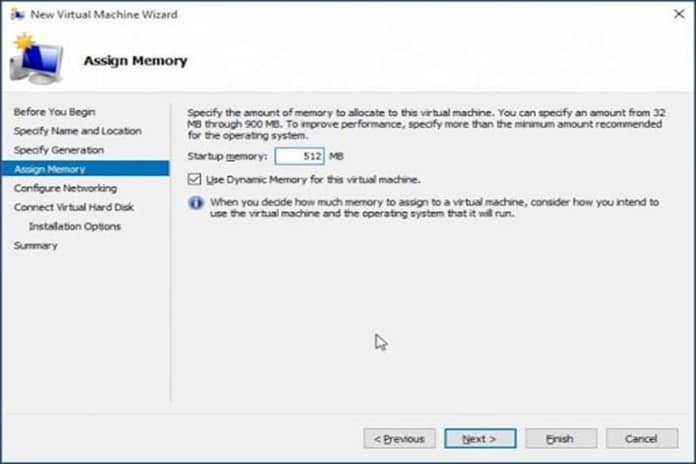
Additionally, also decide how much memory you want the virtual machine to have. This will vary according to the memory you have available on your desktop. In case your RAM is limited, it is best to uncheck the “Use dynamic memory” option.
After assigning memory, a Configure Networking screen will be shown. You can choose to configure your network then and there or return to it later on by clicking “Next.” For installing the operating system on Hyper-V, you must first configure a hard disk. You can decide the location of storage, the amount of space to be given to the virtual machine.
Finally, review all your options, and when you are satisfied with all your settings, click Finish to activate and launch Hyper-V.
Things to know about Hyper-v
Merely knowing how to enable and run hyper-v is not enough – especially if you are a newbie. Here are some crucial points you must remember at all times!
1. Virtual Machine names can be confusing
When you create a new virtual machine, as mentioned above, you have to give a name to it. Many people make the mistake of thinking that this name is automatically associated with the linked guest operating system.
For instance, let’s say you name your virtual machine Office 2020. And you run it on Hyper-V called Hyper-V-3, your PC window will retain its own name. It won’t automatically match the virtual machine name.
To avoid confusion, modify the computer name during the launching process too.
2. Checkpoints are not full proof
Checkpoints refer to the different native hyper-v features which enable a given virtual machine to revert back to its previous version. By making checkpoints, you can save your progress and undo any errors you make within the virtual machine later on. On the surface, these native features seem great.
However, there are certain problems with using checkpoints. Firstly, you must not treat checkpoints as backups. In case of a hard drive failure, your checkpoints will disappear too. Therefore, it is imperative to back up your progress using another method.
Secondly, if you create a lot of checkpoints, the read performance of the virtual machine will visibly suffer. Finally, the feature can also lead to consistency problems. Sometimes, they might not fully undo changes made when Active Directories are involved.
Ending Remarks
While hyper-v is a great tool to enable in Windows 10, don’t overestimate its functionality. There are certain programs that rely on the presence of specific hardware for performance. A virtual machine is not an answer for them.
For instance, games that rely on GPUs might not be able to run well on virtual machines. The same is the case for applications that need sub-10ms timers.
It is always a good idea to be well-aware of the limitations of a given tool before you activate it. Make sure to use hyper-v for purposes it is best built for. For those purposes, it will surely not disappoint!